
The Bottom Line: Translating a Webflow CMS collection manually is a massive time sink: the only scalable workflow is to export your collection as a CSV, use a specialized AI engine to localize your rich text and SEO fields while skipping your slugs and reference IDs, and re-import the data to update hundreds of items in minutes.
This guide will show you how to translate an entire Webflow CMS collection, from export to re-import, in under 10 minutes using AI Glot’s selected columns mode.
If you have read our overview of how Webflow Localization works, you know that the native Editor is great for static pages but becomes painfully slow for large CMS collections. Translating 200 blog posts field by field is not a realistic workflow for most teams.
The solution is straightforward: export the CMS collection as CSV, translate only the text columns, and re-import the result. This guide covers every step with enough detail that you can follow along with your own Webflow project.
Prerequisites
Before you start, make sure you have:
- A Webflow site with at least one CMS collection that contains content you want to translate.
- An AI Glot account (the free tier gives you 2,000 monthly credits plus a 5,000-credit signup bonus, which is enough for a medium-sized collection).
- Basic familiarity with CSV files. If you can open a spreadsheet, you are good.
Step 1: Export your CMS collection from Webflow
Open your Webflow project and navigate to the CMS panel (the database icon in the left sidebar). Select the collection you want to translate. For this example, we will use a “Blog Posts” collection, but the process is identical for product pages, case studies, team members, or any other collection type.
Click the settings gear icon on the collection, then select “Export CSV.” Webflow will download a file containing every item in the collection, with each field as a column.
Open the file in any spreadsheet application (Google Sheets, Excel, Numbers) to get a sense of the structure. A typical blog collection export looks something like this:
| Name | Slug | Post Body | Post Summary | Main Image | Category | SEO Title | SEO Description | Published On |
|---|---|---|---|---|---|---|---|---|
| Building our API | building-our-api | <rich text> | A technical deep dive… | uploads/api.webp | Engineering | Building our API - Blog | Learn how we… | 2026-01-15 |
Take a moment to identify which columns are “content” and which are “structure.” This distinction is the entire foundation of the workflow.
Content columns (translate these):
NamePost BodyPost SummarySEO TitleSEO Description
Structure columns (leave these alone):
Slug(your URL path)Main Image(a file reference)Category(a collection reference ID)Published On(a date)
This is a golden rule for any CMS export translation: if the field contains data that another system reads programmatically (URLs, IDs, dates, filenames), it should not be translated. Only human-readable text fields get the translation treatment to avoid breaking your import.
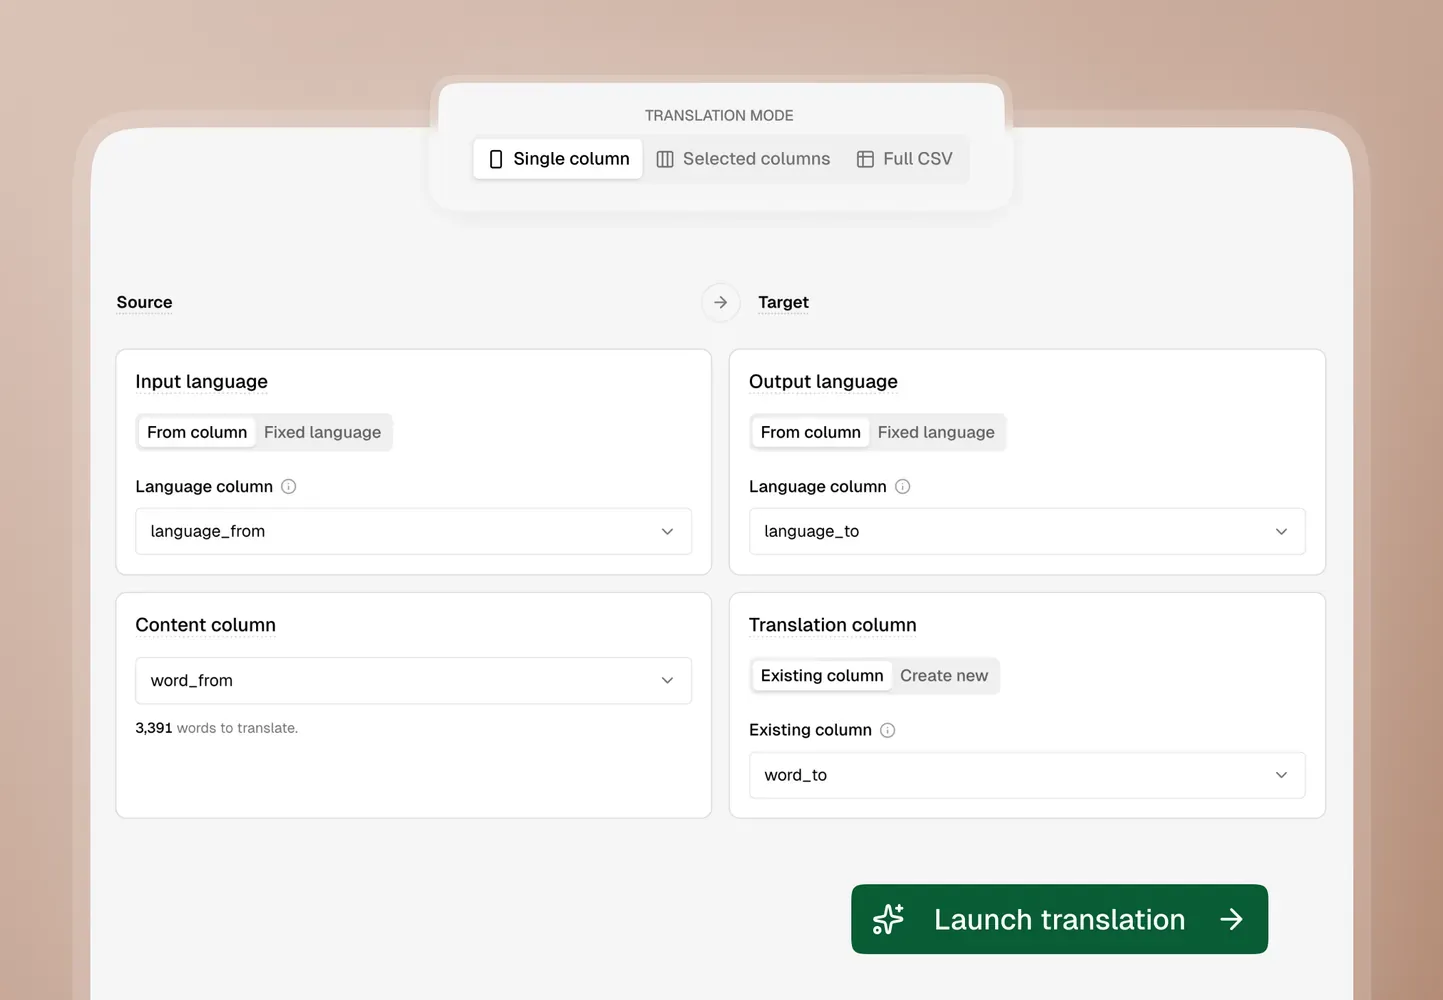
Step 2: Upload to AI Glot and select your mode
Log in to AI Glot and upload the CSV file you just exported. The platform will automatically analyze the file structure, detecting the number of columns, rows, and the likely source language.
Here is where the mode selection matters. For Webflow CMS exports, Selected Columns mode is almost always the right choice. This mode lets you explicitly mark which columns should be translated and which should remain untouched.
When the analysis is complete, you will see a mapping interface. For each column, you decide:
- Translate: The AI will process this column’s content.
- Skip: This column passes through unchanged.
For our blog example, the mapping would be:
| Column | Action | Why |
|---|---|---|
| Name | ✅ Translate | Article title, reader-facing |
| Slug | ❌ Skip | URL path, must stay in English |
| Post Body | ✅ Translate | Main content, the bulk of the work |
| Post Summary | ✅ Translate | Excerpt shown on listing pages |
| Main Image | ❌ Skip | File reference, not text |
| Category | ❌ Skip | Collection reference ID |
| SEO Title | ✅ Translate | Shown in search results |
| SEO Description | ✅ Translate | Shown in search results |
| Published On | ❌ Skip | Date, not translatable |
This explicit mapping is what separates a structured translation workflow from the “paste everything into ChatGPT and hope for the best” approach. You are telling the AI exactly where the boundaries are, and those boundaries are locked in before a single word gets processed.
Step 3: Configure language and glossary
After confirming your column mapping, set the target language. AI Glot supports a wide range of language pairs, and the source language is usually auto-detected from the content.
This is also the right moment to add glossary terms if you have brand-specific vocabulary. For example:
- Your company name should never be translated.
- Technical product names like “FlowEngine” or “DataSync Pro” should stay in English.
- Industry terms might have preferred translations in your target market.
If you are translating a blog, you might add entries like:
| Source term | Target term (French) | Notes |
|---|---|---|
| AI Glot | AI Glot | Brand name, never translate |
| no-code | no-code | Industry term, keep in English |
| CMS | CMS | Technical abbreviation |
| API | API | Universal term |
Glossaries become increasingly valuable as your collection grows. Translating 10 articles without a glossary might produce acceptable results. Translating 300 articles without one will produce noticeable inconsistencies where the same term is rendered differently across posts. This is why you should build a translation glossary before starting your first major batch.
Step 4: Review and launch the translation
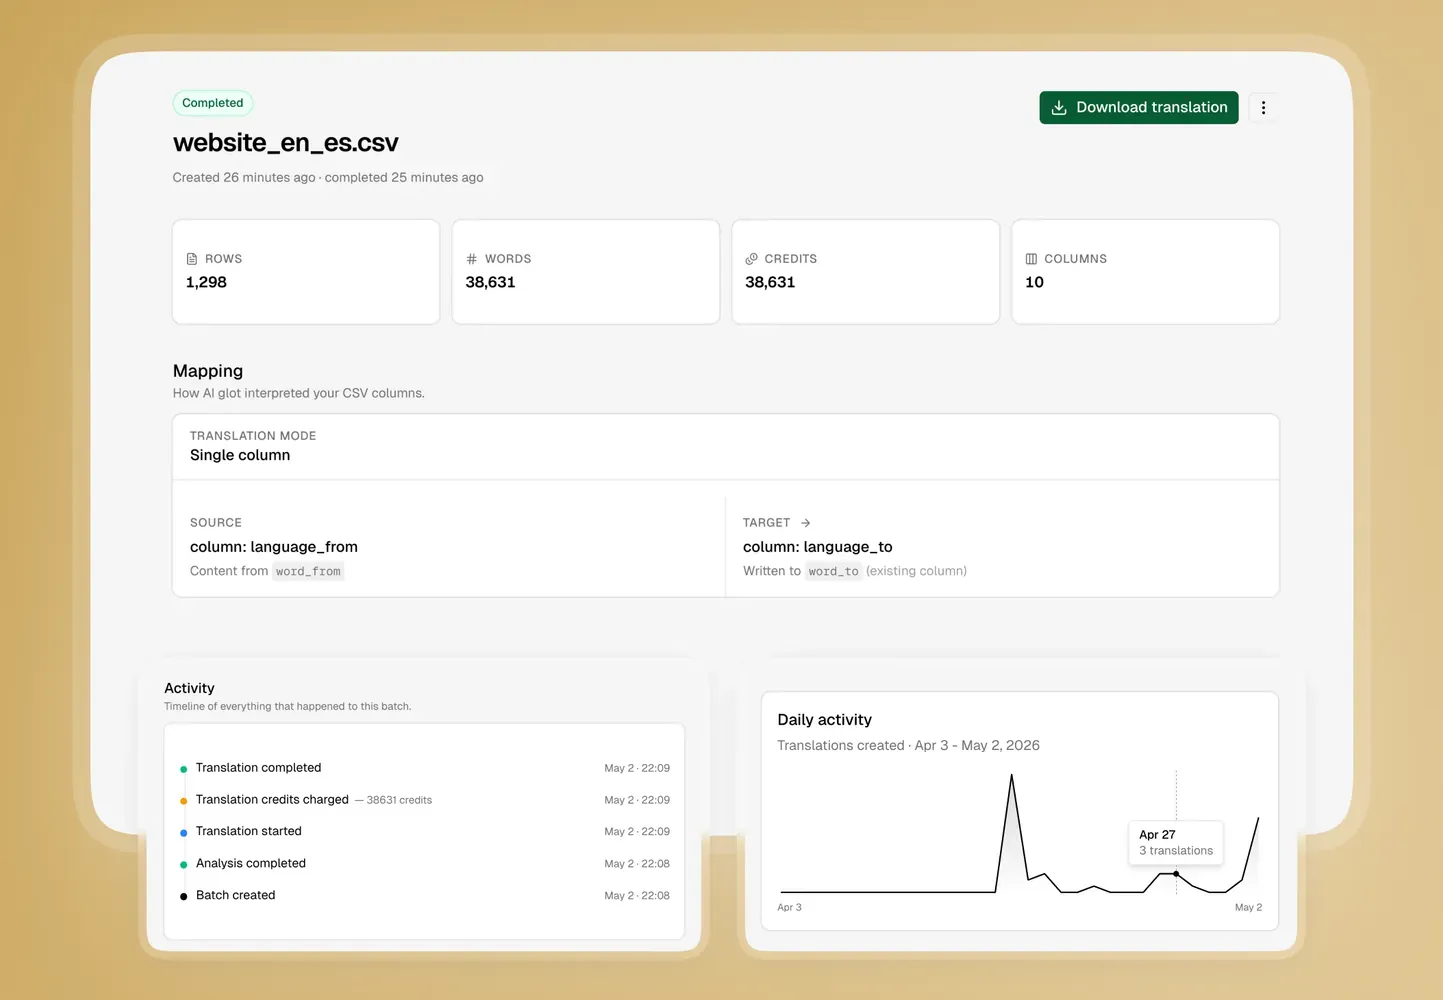
Before AI Glot spends any credits, you get a full preview of the job. This review screen shows:
- The total number of words being translated.
- The estimated credit cost.
- Which columns are included and which are excluded.
- A sample of the source content.
Take a few seconds to review this. It is much better to catch a mistake now (like accidentally including the Slug column) than to discover it after the translation is complete.
Once everything looks right, hit “Translate.” AI Glot processes the content in the background. You do not need to keep the browser tab open. For a 200-item blog collection, this typically takes a few minutes.
Step 5: Download and re-import into Webflow
When the translation is complete, download the translated CSV. Open it in a spreadsheet app to do a quick spot check: make sure the translated text looks right, the slugs are unchanged, and the row count matches the original.
To re-import into Webflow:
- Go to your CMS collection settings.
- Click “Import CSV.”
- Upload the translated file.
- Webflow will ask you to map the CSV columns to your collection fields. Match them up and confirm.
Important: Webflow matches items by their Slug field during import. As long as you kept the slugs unchanged (which Selected Columns mode guarantees), the translated content will be applied to the correct items.
If you are working with Webflow’s native Localization feature, you may need to import the translated content into the specific locale variant of each item. Some teams use the Webflow API for this step when dealing with very large collections.
Handling rich text fields
Webflow’s Post Body field (or any Rich Text field) exports as HTML in the CSV. This is actually a good thing for translation purposes because the AI can understand the semantic structure of the content, headings, paragraphs, lists, and links.
AI Glot processes the HTML content while preserving the markup. So a paragraph like:
<p>Our <strong>new API</strong> supports <a href="/docs">full documentation</a>.</p>Gets translated to something like:
<p>Notre <strong>nouvelle API</strong> prend en charge <a href="/docs">la documentation complète</a>.</p>Notice that the HTML tags, link href attributes, and structural elements stay intact. Only the visible text content changes. This means the re-imported content will look exactly like the original in the Webflow Designer, just in the target language.
What about ongoing content?
This CSV workflow is most powerful for initial bulk translation, like taking your existing 200-post blog backlog and making it available in French.
For ongoing content (new posts published weekly), you have two practical options:
- Translate new posts natively in the Webflow Editor as they are published. If it is 1-2 posts per week, the manual workflow is manageable.
- Batch new posts monthly by exporting the collection, filtering for untranslated items, running them through AI Glot, and re-importing.
Most teams find that a hybrid approach works best: native localization for real-time editorial needs, and periodic CSV batch runs for everything else.
The bottom line
Translating a Webflow CMS collection does not have to mean weeks of manual copy-paste in the Editor. The CSV export path gives you a controlled, repeatable workflow that handles hundreds of items in the time it would take to manually translate ten.
The key is using Selected Columns mode to protect your structural data while letting AI handle the content. Combined with a glossary for brand consistency, this workflow turns Webflow localization from a bottleneck into a routine operation.
Ready to translate your first Webflow collection? Sign up to AI Glot and run a test batch on your smallest collection to see the workflow in action.

